Tuesday 17 February 2015

How to create and customize tables in Microsoft Word

Creating tables in Microsoft Word used to be so annoying that most people just did it in Excel, then imported it into Word. It's worth giving Word 2013's table tools a try, though, because the process is easier, and there are some new graphical options. 

Seven ways to create tables

Microsoft now provides five different methods for creating tables: the Graphic Grid, Insert Table, Draw Table, insert a new or existing Excel Spreadsheet table, and Quick Tables, plus an option for converting existing text into a table. To start, open a blank Word document from the Home/New page. Position your cursor in the document where you want the table inserted.
Graphic Grid/Select Table from Graph
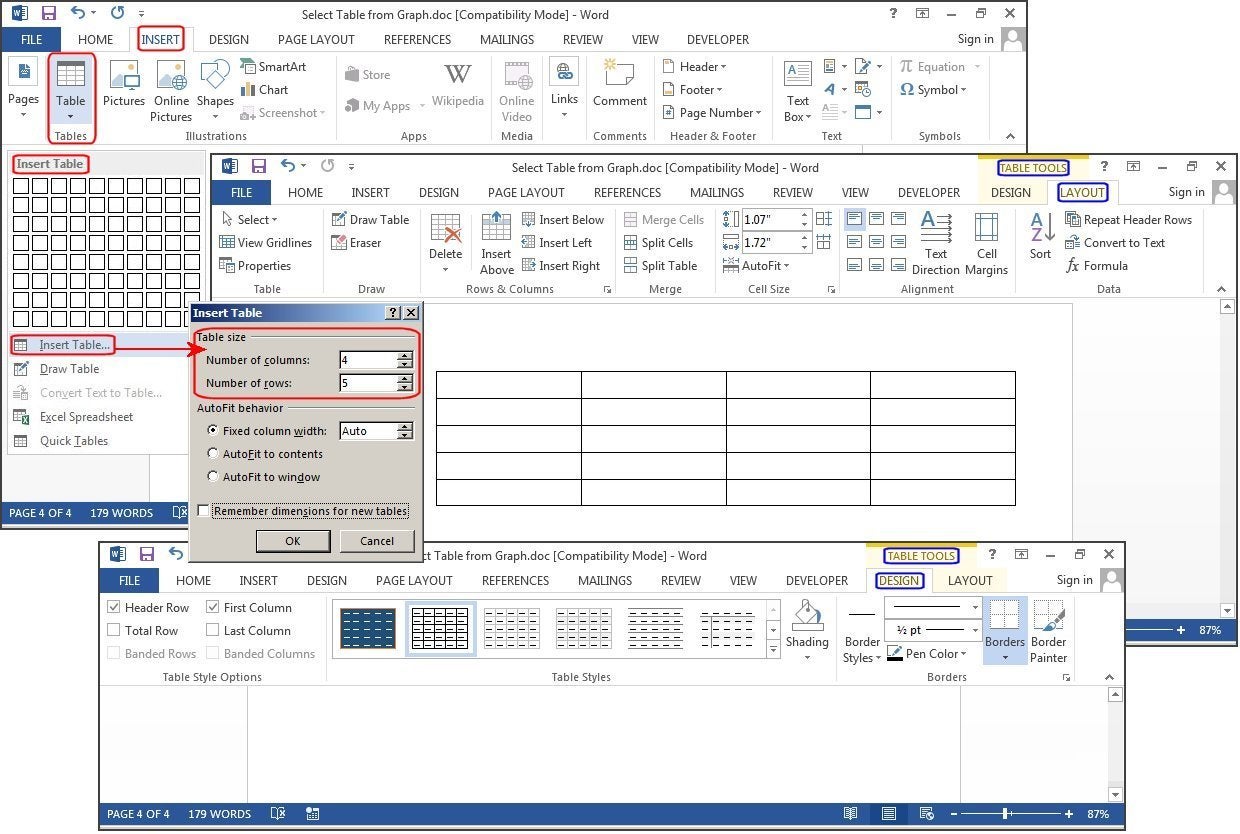
Under the Insert tab, click the Table button. The Insert Table dialog box will open, showing a basic grid pattern as well as traditional menu options below it. Place your cursor on the first cell in the grid and slide it down and over until you highlight (for this example) four columns and five rows, then click once.
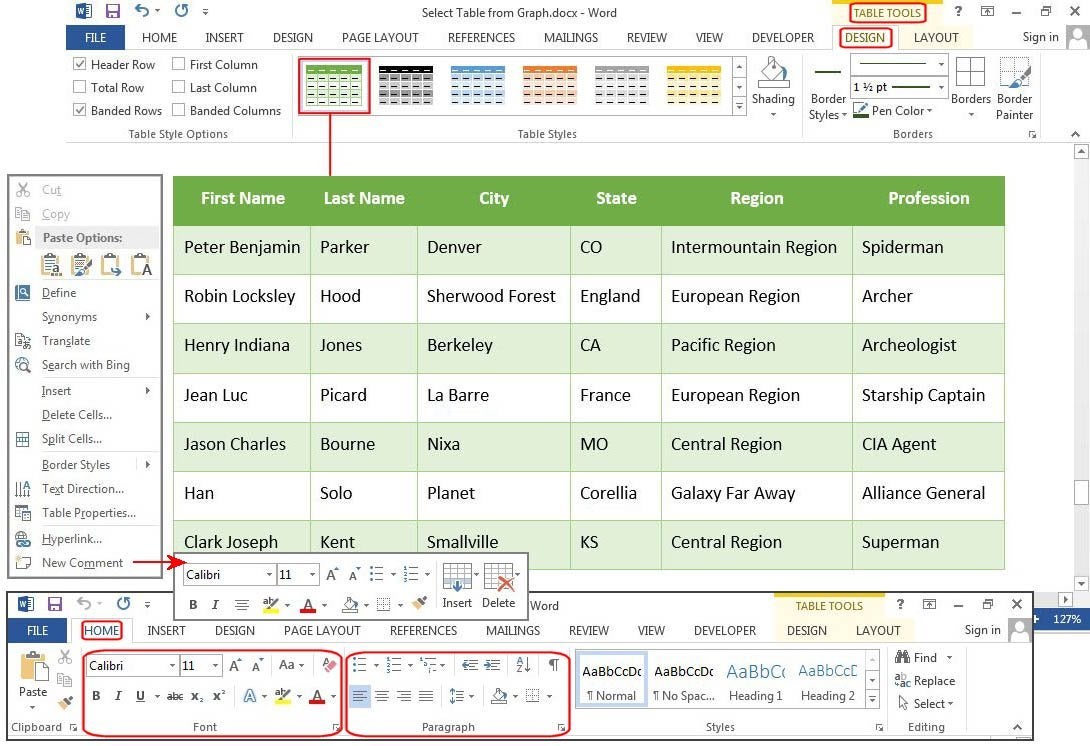
Notice that once the table is created, a new option called Table Tools appears on the Ribbon bar with two new tabs: Design and Layout. See the Layout and Design section below for details regarding these options.

f1 insert table grid
Create a new table using the graphical grid.

Insert Table
Click Insert > Tables > Insert Table from the dropdown menu. In the Insert Table dialog box, enter the number of columns and rows you want in this table (four columns and five rows). In the AutoFit Behavior panel, select Auto, or click the down arrow to choose a specific size. You can also choose AutoFit to Contents (produces narrow columns that expand as you add data) or AutoFit to Window (expands the table to fit the document size). Check the Remember Dimensions for New Tables box if you want the sizes you’re entering now to become your defaults for future tables.

f2 insert table insert table
Create a new table using Insert Table.

Draw Table
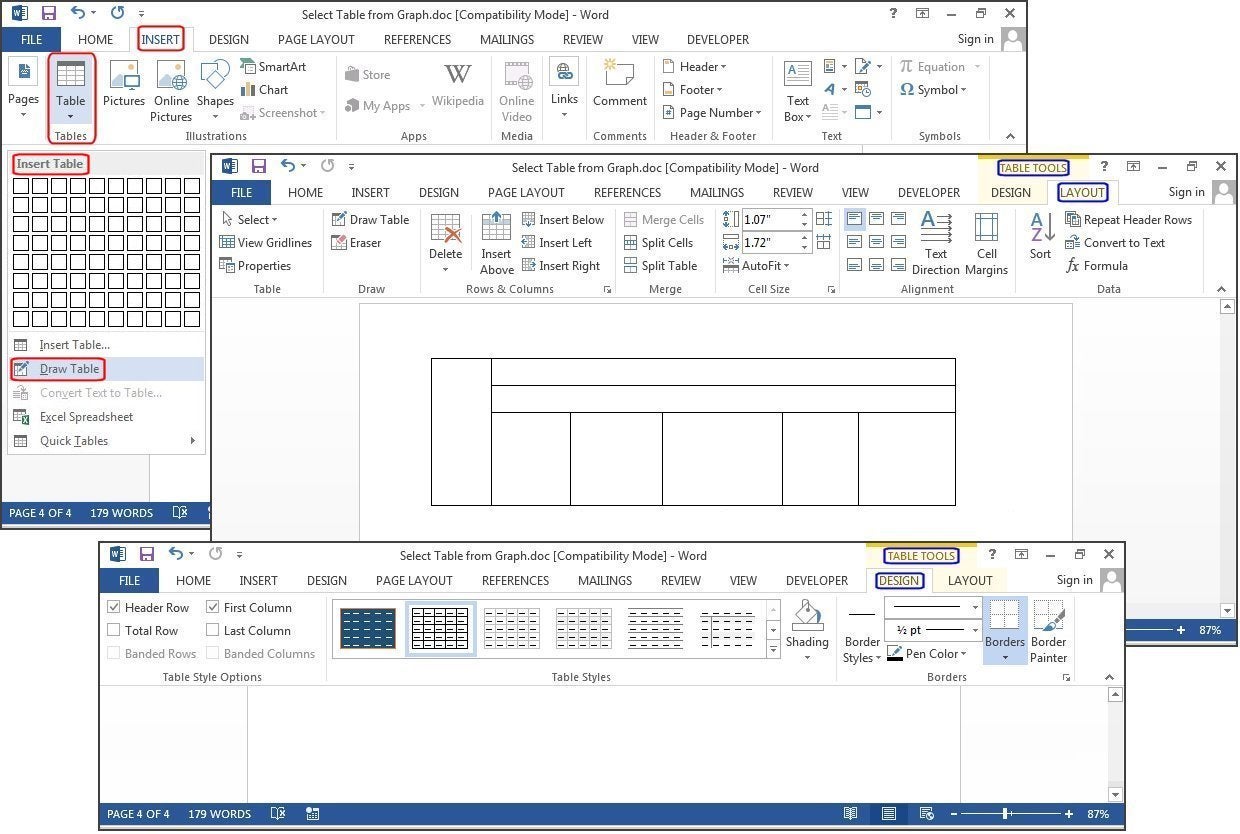
Click Insert> Tables > Draw Table. The cursor turns into a pencil, which you drag down and across to draw a box. Don’t worry about the exact dimensions; you can modify it any time.
Once the box is created, position the cursor inside the box and draw lines over and down for the columns and rows (one at a time). Don’t worry about crooked lines, either—Word straightens them as you draw.
To add or remove columns and/or rows later, click anywhere inside the table, then select the Design tab under Table Tools. Click the Draw Table button to add or continue drawing lines with your pencil cursor, or click the Eraser button to remove lines with the eraser cursor. To remove a line, just touch the line with the eraser cursor, and the line disappears.

f3 insert table draw table
Create a new table using Draw Table.

Excel Spreadsheet (create In Word)
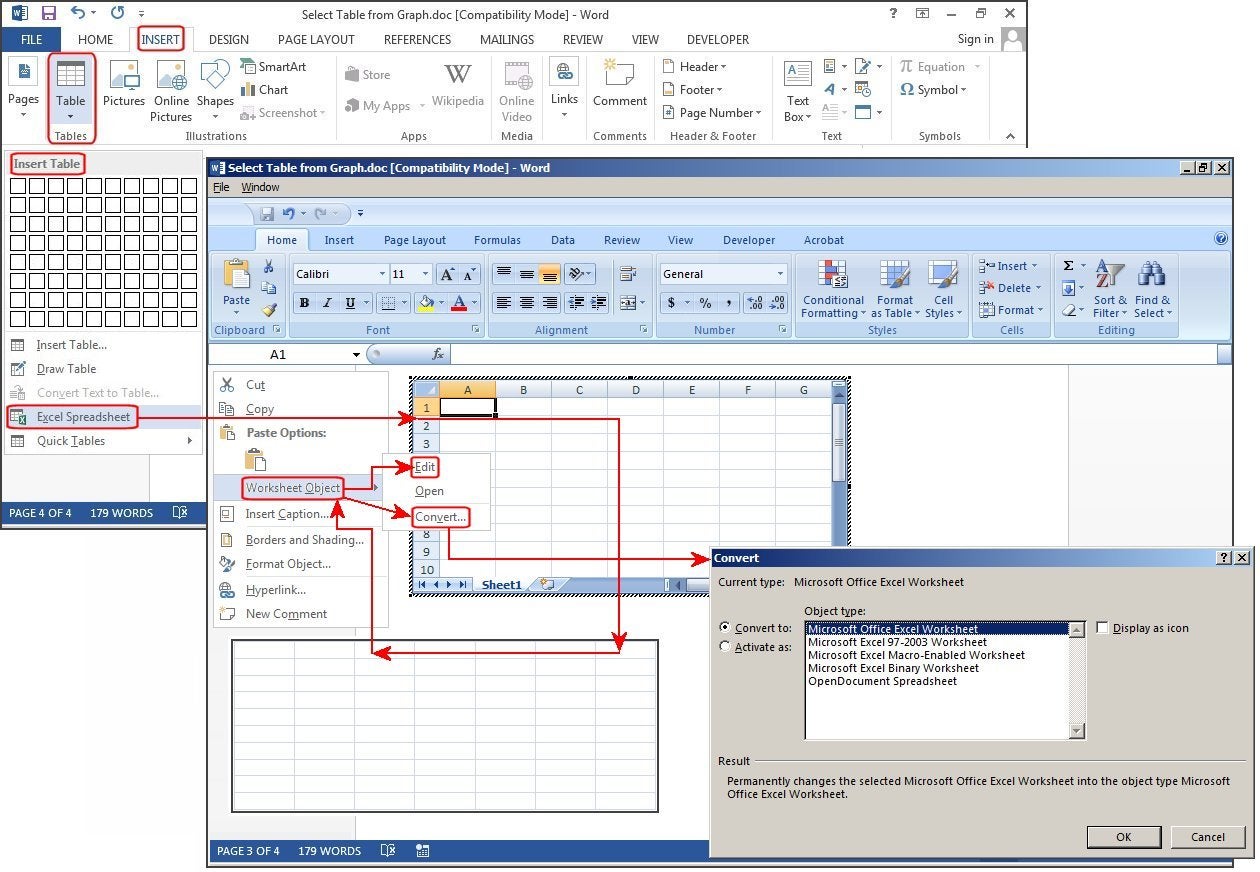
Click Insert > Tables > Excel Spreadsheet. An Excel spreadsheet inserts at your cursor location. You can continue using Excel and its menus and commands, but after you enter your data it converts to a non-editable graphic.
If you want to add, delete, or modify the spreadsheet, right-click anywhere inside the worksheet graphic, select Worksheet Object from the dropdown menu, then click Edit. The original spreadsheet reappears for editing. Notice the top menu has changed to an Excel menu for edits.
Also from the Worksheet Object dropdown menu, you can click Open to open the spreadsheet in Excel, so you can manipulate it in that program. Or click Convert to view a Windows dialog box that lists file-conversion options.

f4 insert table excel spreadsheet
Create a new table using Excel Spreadsheet.

Excel Spreadsheet (copy and paste existing worksheet)
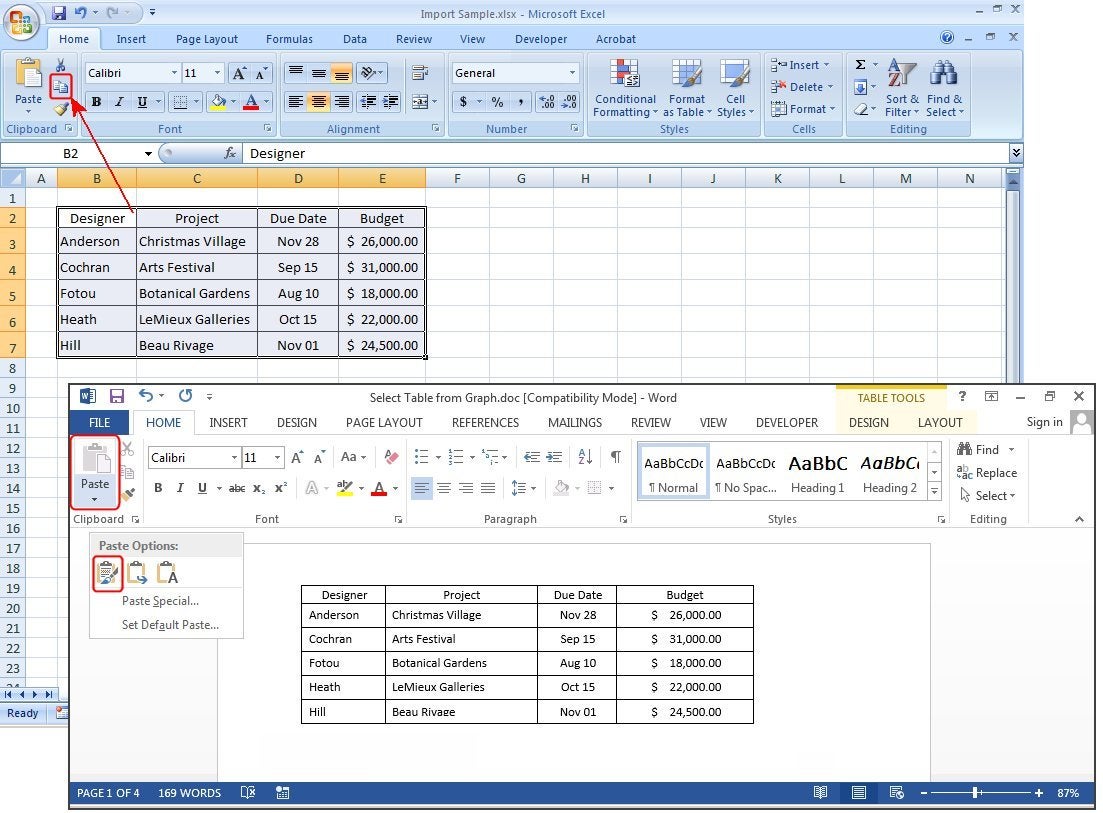
In the old days, Excel spreadsheets had to be imported into Word. Now you can just copy and paste. Open Excel, highlight the spreadsheet, and copy it. Then open Word, position your cursor at the desired location, and select Paste > Keep Source Formatting.
The other options on the Paste dialog menu are Merge Formatting, which changes the text format to match the file into which you pasted the spreadsheet, and Keep Text Only, which pastes the text without the Excel grid, meaning you will likely have to realign your columns with tabs.
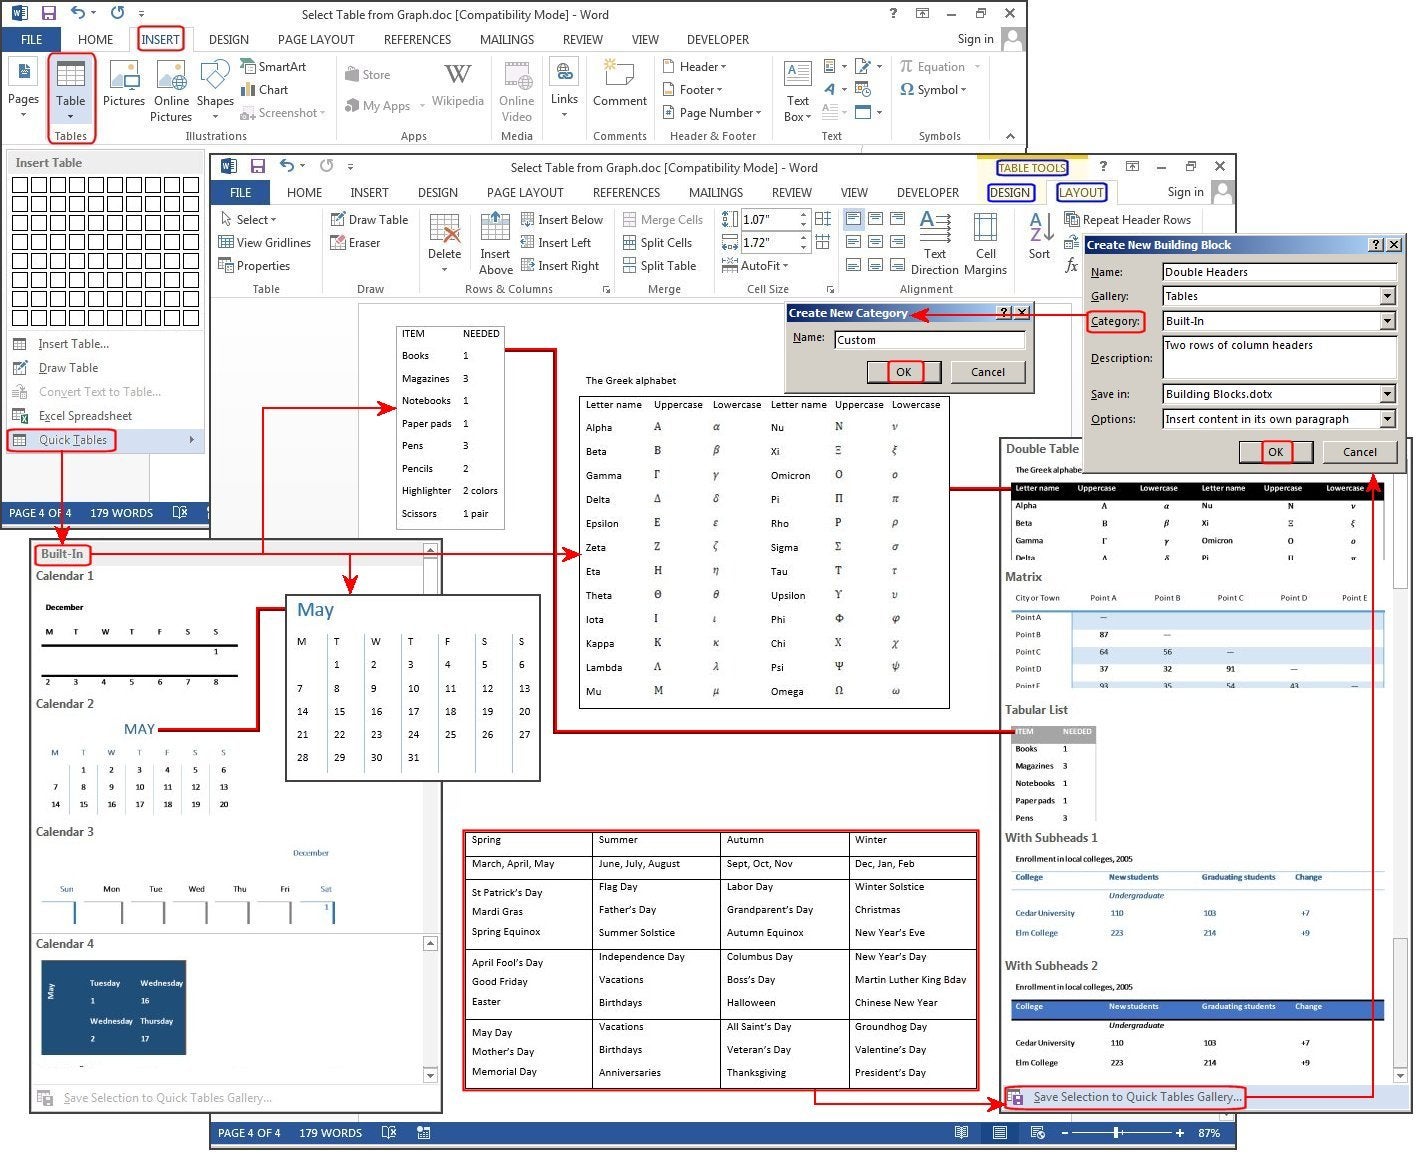
f5 copy paste excel spreadsheet
Copy and paste an existing table from Excel.

Quick Tables
Quick Tables are Word’s table templates. In addition to the nine templates provided, you can create your own designs and save them to the Quick Tables Gallery to use later. Click Insert > Tables > Quick Tables. Select a table template from the Quick Tables menu, then modify it to fit your project. 

f6 insert table quick tables
Create a new table using Quick Tables.

Convert Text to Table
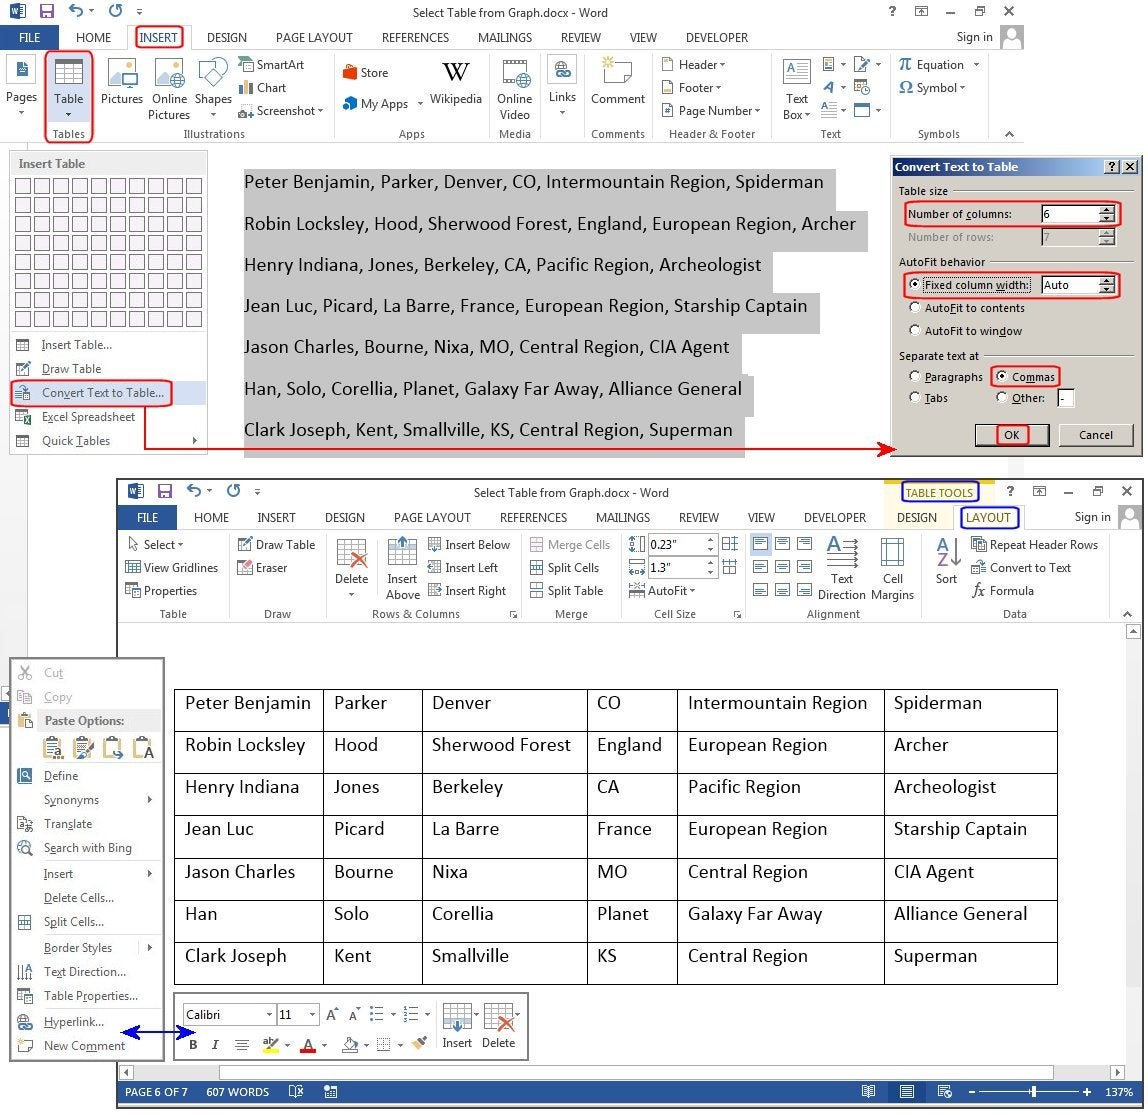
The table tools can also make lists a lot easier to customize and even reorganize later. For our example, we'll turn a classic contact list into a table, using a list of names—first, middle, last—plus the city, state, region, and profession of each person on the list.
For eons, people have used tabs to separate the fields, adding a tab or two to accommodate longer strings of data. But if you do this, when you convert the table to text, it misplaces all the data.
With the Convert Text to Table feature, you can separate the fields (Name, City, State, etc.) with paragraphs, tabs, commas, or other separator character, but use only one separator between each field.

f8 comma separatedhighlighted
Convert an existing block of text to a table.

Layout and Design

There are three options to modify and/or decorate tables:
1. Use the Table Tools > Design—or—Table Tools > Layout commands on the Ribbon menu.
2. Right-click and use the Shortcut popup menus.
3. Use the keyboard shortcuts, which become visible when you press the ALT key on your keyboard.
All of these methods are fast and easy, but using a combination of all three will always be quicker. For example, use your mouse to highlight, then right-click to copy with your right hand; then arrow down to the new location and press CTRL-V to paste with your left hand.
Layout tab
The Layout tab lets you modify the structure of the table. The menu is fairly self-explanatory, and you can roll your cursor over a feature to get further clarification.
f9 layout tab
Roll your mouse over each button to view how each feature works.
The dialog boxes below also illustrate each feature. Click Table Tools > Layout > Insert or Delete (from Rows and Columns group) to add or remove them; Merge or Split Cells orSplit a Table (from the Merge group); or Text Direction (from the alignment group) to rotate the text inside the table.
f10 layouttab2
Menu options to modify a table structure.
Other features include Table Properties, which provides several options for aligning the table with the text or wrapping text around your table. Select Cell Margins to change the margins inside each cell. With the table still highlighted, click Table Tools > Layout > Data > Sort to sort the table data alphabetically or numerically, just like in Excel. You can sort by column numbers or by column headers, and it provides two sort levels. For example, you can sort by Last Name, then by First Name. The table below is sorted by Last Name.
You can also convert your table back to a text block. Just choose the separator you prefer, so when the table grid disappears, the data isn’t all jumbled together.
You can even insert formulas to calculate your numeric data. I added a Salary column to the table below and entered some dollars, plus a new row at the bottom for the salary totals. To calculate the total salaries, position your cursor in the last row and the last column cell, and click the Formula button under the Data group. In the Formula dialog box type the SUM() formula [or Count() or Average()] in the Formula field box. If you are unfamiliar with the formulas Word provides, click the down arrow under the Paste Function field, and choose a formula from the list.
Type Above between the parentheses, choose a format under Number Format such as dollars, percent, or general, then click OK. Word calculates the column of numbers and places the calculation in the target cell (where your cursor resides). Review the Formula Format table in the graphic below for the correct commands that tell Word which direction to calculate (these go inside the parentheses).
f11 layouttab3
Wrap text around a table, change cell margins, convert table back to text, sort the table data, and/or add formulas.
Design tab
The Design tab is for adding borders, shading, styles, and customizing the header columns and rows. Highlight your table, then select Table Tools > Design> Table Styles,ShadingBorder StylesBorders, or Border Painter (see the graphic below for ideas). There’s no learning curve, just play with the features and see what happens. If you don’t like a feature you’ve added, just click the Undo button or press CTRL-Z.
There’s also an option to add artwork borders to your pages. Select Table Tools > Design > Borders > Border Painter, and click the Page Border tab in the Borders and Shading dialog box. Click the down arrow in the field box under Art, then choose a border—mostly simple clip art—from the list. 
f12 design tab
Make your table pop with Table Styles, Shading, Border Styles, Borders, or Border Painter.
The table below uses one of the many preset styles that comes with Word. Select Table Tools > Design > Table Styles, then scroll through the gallery of styles. If you want to change the font or customize the paragraphs inside the table, use the Format Shortcut menu. Right-click anywhere inside the table, and this small menu pops up adjacent to the longer Table Options menu. If the formatting feature you need is not on the Shortcut menu (which is fairly limited), click the Home Tab and select the features you need from the Font or Paragraph group. All of the buttons and groups on the Home tab are available for formatting tables as well as documents. The options are endless. 
f13 final touches
Choose a Table Style with Banded Rows (i.e., every other row is different for easier viewing), then customize the fonts and paragraph spacing.

No comments:

Post a Comment