Microsoft Word can keep you up all night, and not only because you've got writer's block. You change the font, and Word changes it back. The columns don't line up. The program freezes up, taking your work with it.
If you've customized Word considerably--changing styles or writing macros (especially writing macros)--a restored backup is your best bet. Windows 7 users may be able to do this even if they haven't been consciously backing up. Right-click the file Normal.dotx (or Normal.dotm) and select Restore previous versions. Try restoring one of the versions that comes up and see if it helps.
First, there's plain old manual file-saving. You've done it. You press CTRL-s and save the file. The first time you do it with a new file, you have to give the document a name and tell Word where to store it. After that, you just press CTRL-s.
Ever try to lay out a page where the text on the left has to line up vertically with the text on the right? Take, for instance, a résumé, where the word Experience in the left column lines up with the top of several paragraphs listing past jobs. Then the word Education on the left must start on the same line as your graduate school.
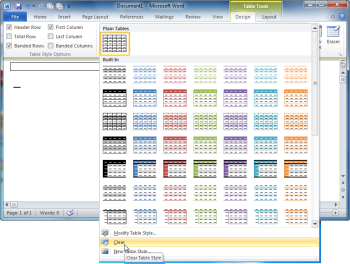
Two more ribbons will appear, in a section called "Table Tools." Click this section's Design tab. Pull down the Table Styles panel by clicking the tiny line and arrow icon in its lower-right corner, and select Clear.
Here are five common Word disasters that can ruin a good night's sleep--and what you can do to fix them. The advice below works in both Word 2007 and Word 2010.
1. Word Fails to Load
Talk about a nightmare. You load your word processor, and it either freezes up or closes down. You can't do anything with it.
Chances are that your Normal template has been corrupted. Replacing it with a backup or letting Word recreate it from scratch will probably get things working again.
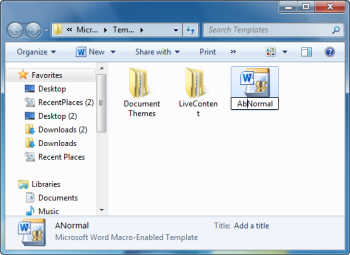
The first thing that you'll need to do is to open the Template folder. This will probably do the trick: With Word closed, click Start (or Start, Run in XP), and then type%appdata%\microsoft\templates, and press ENTER.
Otherwise, if you have another backup, see if you can restore the file from that.
If not, rename the Normal.dotm file. It doesn't matter what you name it. Abnormal will do. When you relaunch Word, it will recreate a new Normal.dotm file containing Microsoft's default settings.
Depending on how corrupt your Normal template is, you may still be able to load it after Word is up. In Word, click the Office orb (Word 2007) or the File ribbon tab (Word 2010), and click New. Select My templates, then Abnormal (or whatever you named the file).
If the new document you just created doesn't crash Word, you can continue to use Abnormal.
2. Word Crashed--and Took My Work With It
Like every other computer program ever written, Word occasionally crashes. So does Windows, which takes Word down with it. And hardware can crash too, taking both Windows and Word down.
Whatever the cause, the reality is unavoidable: Word will occasionally go down without giving you a chance to save your work. But how much will you actually lose and how can you lessen this disaster?
Word saves your documents in two ways. Use them both wisely, and you'll minimize the loss when disaster hits.
It's a good idea to get in the habit of pressing CTRL-s frequently. Do it when you get up to stretch, when you pause for a thought, or when you write a good sentence. There, I just did it.
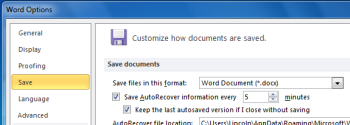
But since saving a file this way depends on your work habits, it's not entirely reliable (no offense intended). Luckily, Word has another way to regularly save your document: AutoRecover.
It's probably already turned on, but let's make sure. If you're using Word 2007, click the Office orb, then Word Options. Word 2010 users should click the File ribbon tab, then Options in the left pane. Click Save in the left pane. Make sure Save AutoRecover every nminutes is checked. You can change the number of minutes if you like. I prefer 5 to the default 10. Word 2010 users should also check Keep the last autosaved version if it's not already checked.
At the set intervals, AutoRecover saves your document with a different name in a folder that you never need to open. When you close a document or exit Word properly, the file is deleted. That's important to remember--these files are temporary and are no substitute for the real .docx file that you save manually.
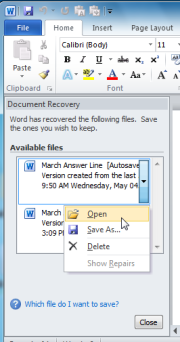
But should Word, Windows, or your hardware crash, you'll be glad it's still there. Bring up Word, without loading a document, and a document recovery pane on the left will let you pick between the last AutoRecover and the last regular Save. Pick the one saved last.
3. My Columns Don't Line Up
Most people try to set up this type of layout either with tabs or with Word's Columns feature. Both approaches guarantee needless busywork and headaches. You can spend an hour getting everything laid out perfect, then realize that you need to add one sentence, throwing everything off.
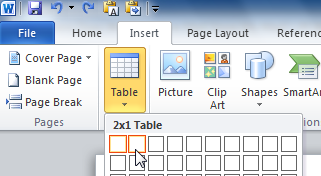
The solution: Don't use columns or tabs. Use a table.
On the Insert ribbon, pull down the Table icon and select two columns/one row (assuming you want two columns).
This will make the table appear, but that's a problem. You don't want it to look like a table.
If the table disappears entirely, click theLayout ribbon in the Table Tools section, then click View Guidelines over to the left. That way, you'll see the table, but it won't print.
If you don't want the two columns to be equally wide, drag the vertical line separating them to make each the right size.
Here's how to use the table: Pressing TAB the in left column will bring cursor to the right column. Pressing TAB in the right column will send the cursor to the next row down. If you're in the table's last row, it will create another one. Pressing ENTER will insert a new line in the current row.
So in that résumé I described above, you could type Experience in the table's first cell, press TAB, and type a description of your last job. Then press ENTER to put your previous job in another paragraph while remaining in the right column. When you're done entering jobs, press TAB again to start a new row for education.
4. The Default Font Will Not Die
You don't like Word's out-of-the-box default font--it may be 11-point Calibri--so you change it. The next time you start a new document, it's 11-point Calibri. So you change it again. The next time you...well, you get the idea.
The trick is knowing where to change the font once and for all. Make the change in the Normal template, and it will stick.
Start a new document using the Normal template. If you don't know what I'm talking about, don't worry about it. Unless you know enough to do otherwise intentionally, your new documents are already using the Normal template.
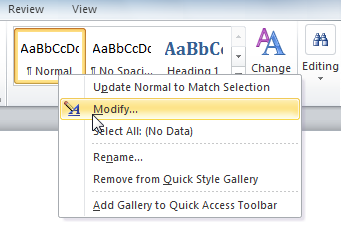
On the Home tab, in the Styles section, right-click the Normal box and select Modify. Change the font in this dialog box, then click New documents based on this templatebefore clicking OK.
If you use other templates besides Normal, you may have to change the default font in those templates, as well.
5. You Need to Reformat These Paragraphs But Not Those
It's a long document, broken up with subheadings. Then orders come down from on high: The subheadings, and only the subheadings, need to be in a different font.
For instance, you created the entire document in 12-point Bookman Old Style. To make the subheadings stand out, they're also bold and underlined. Your boss says they must be in 14-point bolded Arial.
You could go through the entire document and change them manually, but that's a real pain. And if you're told to change them again, it's a double pain.
If you used styles wisely when you created the document--for instance, assigning the Heading 2 style to the subheadings and the Normal style to everything else--you've got it covered. The job is easy:
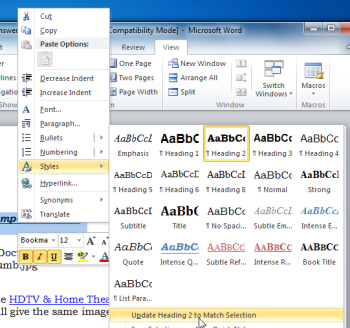
Go to one of the subheadings--it doesn't matter which one. Select the entire paragraph, and change the formatting in whatever way you wish (or your boss wishes). Then right-click the paragraph, select Styles, then Update style name to Match Selection. For instance, if your subheadings use the Heading 2 style, you'd select Styles,then Update Heading 2 to Match Selection.
But if you didn't use styles to begin with, things will be more difficult. (And you'll probably use styles from now on.) You need to replace the formatting that currently defines subheadings with a style. You can do this with Find and Replace.
With the document up, press CTRL-h for the Find and Replace dialog box. Leave both the 'Find what' and 'Replace with' fields blank. If there's a More button in the lower left corner, click it.
Click the Format pull-down menu button. Select the options for the formatting that currently distinguish the headers. For instance, with our bold-and-underlined example, select Format, Font. For Font style, select Bold. For the Underline style, select the appropriate option.
With the cursor in the 'Replace with' field, click Format, then Style. Select the appropriate style, such as Heading 2.
Click Replace All.
Now that your subheaders have their own unique style, you can use the instructions described above to change them--and only them.
When you're processing words, you shouldn't have to worry about things like formattingand protecting your files. You should be free to concentrate on the really difficult parts of the job, like coming up with a good closing paragraph.
No comments:
Post a Comment