Thursday 4 June 2015

10 Word defaults you can customize to work the way YOU want

Word does a good job of assuming how the average user works, but some of Word's default settings can be annoying and inefficient. Some users don't know they can permanently change these settings, so they continue to reset them for each new document or just struggle along. Users should consider resetting the following defaults to work more productively. Of course, there are more defaults to set; feel free to share your suggestions in the discussion below.

1: Line spacing

The default line spacing setting in Word 2007 and 2010 is 1.15, not 1, as it is in 2003. Microsoft believes 1.15 is more readable online. If you're not generating Web content, adjust the style(s) you use in Word's template (Normal.dotx), as follows:
  1. Click the Home tab.
  2. Right-click Normal in the Styles Quick gallery and choose Modify.
  3. Choose Paragraph from the Format list.
  4. In the Spacing section, change the At setting from 1.15 to 1, as shown in Figure A.
  5. Click OK.
  6. Check the New Documents Based On This Template option.
  7. Click OK.

Figure A

This change will adjust all Word styles based on Normal, so be sure that's what you want.

2: Smart quotes

If you generate Web content or other published material, you probably have to undo Word's smart quotes in favor of straight quotes. You can do so quickly enough by pressing [Ctrl]+Z, but that becomes tedious after a while and you might forget. If you use straight quotes more than smart quotes, disable smart quotes as follows:
  1. Click the File menu and choose Options under Help. In Word 2007, click the Office button and click Word Options. In Word 2003, choose Auto Correct Options from the Tools menu and skip to step 4.
  2. Choose Proofing in the left pane.
  3. Click AutoCorrect Options in the AutoCorrect Options section.
  4. Click the AutoFormat As You Type tab.
  5. Deselect the Straight Quotes With Smart Quotes option in the Replace As You Type section, shown in Figure B.
  6. Click OK.

Figure B

Disable smart quotes for all new documents.

3: Paste special

Word's paste special feature retains the source formatting. If you're pasting from foreign sources, you probably reformat it once it's in your Word document. If you do this a lot, change the Paste Special default as follows:
  1. Click the File tab and choose Options. In Word 2007, click the Office button and then click Word Options.
  2. Select Advanced in the left pane.
  3. In the Cut, Copy, and Paste section, choose Use Destination Styles from the Pasting Between Documents When Style Definitions Conflict drop-down.
  4. Choose Keep Text Only from the Pasting From Other Programs drop-down, as shown in Figure C.
  5. Click OK.

Figure C

Several paste settings make this a flexible feature; choose the setting that's most efficient for you.
This feature is significantly different in Word 2003. From the Tools menu, choose Options, and click the Edit tab. In the Cut And Paste section, click the Settings button to display the options shown in Figure D.

Figure D

Figure D
Word 2003 is more specific, but it allows some control.

4: File location

Word saves your documents in My Documents. If you find yourself resetting the save location a lot, reset the default as follows:
  1. Click the File tab and choose Options. In Word 2007, click the Office button and then click the Word Options button. In Word 2003, choose Options from the Tools menu.
  2. Select Save in the left pane. In Word 2003, click the File Locations tab.
  3. Specify the new folder in the Default File Location field shown in Figure E. Or click Browse and locate it that way. In Word 2003, highlight the Documents item and click Modify. Use the Modify Location dialog to specify the new folder and click OK.
  4. Click OK.

Figure E

Word will save documents to the specified folder instead of My Documents.

5: Spacing between paragraphs

When you press [Enter], Word increases the line spacing to add a bit more white space between paragraphs. This extra space isn't the same as a blank line, so you can't delete it by pressing Backspace. To eliminate this extra spacing, do the following:
  1. Click the Home tab. In Word 2003, select Paragraph from the Format menu.
  2. Click the Paragraph group's dialog launcher (the small arrow in the lower-right corner). In Word 2003, click the Indents And Spacing tab.
  3. Check the Don't Add Space Between Paragraphs Of The Same Style option.
  4. Click Set As Default, as shown in Figure F. (Not available in Word 2003, but you can change this format for the current document.)
  5. Click OK.

Figure F

Eliminate the additional white space between paragraphs.

6: Mini toolbar

When you select text, Word displays the mini toolbar, which hosts several formatting options. Even though it's dimmed, it still annoys some users. You can press [Esc] to hide it or you can permanently disable it, as follows:
  1. Click the File menu and choose Options. In Word 2007, click the Office button and then click Word Options.
  2. Choose General in the left pane (if necessary).
  3. In the User Interface Options section, uncheck the Show Mini Toolbar On Selection option, shown in Figure G.
  4. Click OK.

Figure G

Uncheck this option to disable the mini toolbar.

7: Drawing canvas

Word's drawing canvas is a distinct layer for drawing. Objects placed in a canvas have an absolute position and remain together as a group. Most users find the canvas layer difficult to work with and frankly, most users don't need it. If you're still using Word 2003, disable the canvas layer as follows:
  1. From the Tools menu, choose Options.
  2. Click the General tab.
  3. Uncheck Automatically Create Drawing Canvas When Inserting AutoShapes in the General Options section.
  4. Click OK.
Word 2007 and 2010 disables the canvas layer by default. If you happen to be working with the drawing canvas enabled, disable it as follows:
  1. Click the File menu and then choose Options. In Word 2007, click the Office button and then click Word Options.
  2. In the left pane, choose Advanced.
  3. In the Editing section, uncheck the Automatically Create Drawing Canvas When Inserting AutoShapes option, shown in Figure H.
  4. Click OK.

Figure H

The drawing canvas is annoying enough that Microsoft finally disabled it by default in the Ribbon versions.

8: Normal.dotx

Word bases new documents on Normal.dotx, but the template's settings might not fit your needs. If you have just a few changes, customize Normal.dotx. A common customization is to change the font and size. To make the change at the template level, do the following:
  1. Open a new document and click the Home tab.
  2. Click the Font group's dialog launcher (the arrow in the bottom-right corner). In Word 2003, choose Font from the Format menu.
  3. Make the necessary font changes. For instance, you might choose Arial, 12.
  4. Before closing the dialog, click the Set As Default button. In Word 2003, click Default.
  5. In the resulting confirmation dialog, select the option to set the default for all documents based on the Normal template, as shown in Figure I.
  6. Click OK twice.

Figure I

Make a font change at the template level.
Other template customizations you might want to make include margins and styles. Use a custom template, rather than Normal.dotx, to meet requirements that are more complex.

9: Word selection

When you select part of a word and then part of the next, Word selects the whole word for you -- whether you meant to or not. To disable this selection option, do the following:
  1. Click the File tab and choose Options. In Word 2007, click the Office button and then click Word Options. In Word 2003, choose Options from the Tools menu.
  2. Choose Advanced in the left pane. In Word 2003, click the Edit tab.
  3. In the Editing Options section, deselect the When Selecting, Automatically Select Entire Word option, as shown in Figure J.
  4. Click OK.

Figure J

Ridding yourself of this annoying selection behavior is easy.

10: Spelling, grammar, and formatting

Word identifies misspelled words, grammatical errors, and formatting inconsistencies, as you type:
  • A red line indicates a word not found in the dictionary (possibly misspelled).
  • A green line indicates a possible grammatical error.
  • A wavy blue line indicates an inconsistent format.
I recommend that you get used to the display and not disable these features -- they're a helpful indication that something might be wrong. On the other hand, if you find them distracting, you can disable them. To disable the red and green lines, do the following:
  1. Click the File tab and then choose Options. In Word 2007, click the Office button and then click Word Options. In Word 2003, choose Options from the Tools menu.
  2. Select Proofing in the left pane. In Word 2003, click the Spelling & Grammar tab.
  3. In the When Correcting Grammar and Spelling In Word section, uncheck the first three options: Check Spelling As You Type, Use Contextual Spelling, and Mark Grammar Errors As You Type, as shown in Figure K. (There's no contextual spelling option in Word 2003.)
  4. Click OK.

Figure K

You can disable Word's spelling and grammar indicators.
To rid documents of the wavy blue line, do the following:
  1. Click the File tab and then choose Options. In Word 2007, click the Office button and then click Word Options. In Word 2003, choose Options from the Tools menu.
  2. Select Advanced in the left Pane. In Word 2003, click the Edit tab.
  3. In the Editing Options section, uncheck the Mark Formatting Inconsistencies option under Keep Track Of Formatting. In Word 2003, deselect the Mark Formatting Inconsistencies check box in the Editing Options section.
  4. Click OK.
Even the most competent users make an occasional error and these features identify potential problems. Adjusting to them will probably serve most users better than turning them off.

10 Outlook defaults you can customize to work the way YOU want

Perhaps no other Office app lends itself to customization as much as Outlook does. But with all that flexibility often comes confusion and frustration because users don't always know how to help themselves work more efficiently. Changing Outlook's out-of-the-box settings can help you reduce repetitive tasks and help you work a bit more efficiently via the interface. Here are some useful tweaks to make.
Note: This article covers 2007 and 2010; the instructions for 2007 will often be similar for Outlook 2003, but this article doesn't include specific instructions for 2003.

1: Opening folder

When you launch Outlook, it displays Outlook Today view or moves straight to a specified folder. Opening to your preferred folder can eliminate a few clicks and put you right where you want to start your session. To specify which folder Outlook selects when launching, do the following:
  1. Click the File tab and choose Options (under Help). In Outlook 2007, choose Options from the Tools menu, click the Other tab, and skip to step 3.
  2. Choose Advanced in the left pane.
  3. In the Outlook Start And Exit section, click Browse. In Outlook 2007, click the Advanced Options button in the General section and click Browse.
  4. In the resulting dialog, select the folder you want as the default. Figure A shows a secondary Inbox selected, but your view will be unique to your system.
  5. Click OK. Figure B shows the new setting.
  6. Click OK again.

Figure A

Select the folder you want Outlook to select when launched.

Figure B

Check the setting here.
The next time you launch Outlook, it will open to the window specified in step 4. Your default window can be your Inbox or the Calendar, Tasks, or Contacts window. If you create a custom Inbox, you can specify it (as shown in Figure A). The default window can be almost any Outlook folder.

2: Custom address book

If you save addresses in a custom address book, making Outlook default to that address book will allow you to access your contacts with just a few clicks. To make a custom address book the default, do the following:
  1. On the Home tab, click Address Book in the Find group. In Outlook 2007, click the Address Book icon on the Standard toolbar or press [Ctrl]+[Shift]+B.
  2. From the Tools menu, choose Options. The default setting is Start With Global Address List (GAL). If yours is different, someone has already changed it. If you're on Exchange, the GAL is usually members of your organization. This list won't contain the contacts you add yourself. Your contacts are personal to you and are in the Contacts list.
  3. If you want Outlook to default to your contacts, click the Start With Contact Folders option. Or click Custom to make a custom address book the default and set the order of reference using the arrow icons to the right.
  4. To set the actual default address book, select the appropriate book from the When Opening The Address Book, Show This Address List First drop-down (Figure C). In Outlook 2007, it's the When Sending Mail... option.
  5. Click OK.

Figure C

Figure C
You can control which address book Outlook uses as the default.

3: Message format

Most users know that they can send email in different formats:
  • Plain Text uses text characters with no formatting, so it's compatible with all email clients.
  • HTML applies HTML formatting. Most clients can handle HTML, but they don't always render the HTML coding by default.
  • Rich Text allows simple text formatting that's specific to Outlook.
Mobile technologies are quickly displacing this setup, but for now, many users still prefer Plain Text because it's less trouble -- many lists and Web clients don't allow anything else. You can set this default, as follows:
  1. Click the File tab and choose Options under Help. In Outlook 2007, choose Options from the Tools menu, click the Mail Format tab, and skip to step 3.
  2. Choose Mail in the left pane.
  3. In the Compose Messages section, choose Plain Text from the Compose Messages In This Format drop-down, shown in Figure D.
  4. Click OK.

Figure D

You can set the default message format.
You may want to let the default setting handle most of your messages, but you can easily change the default for individual messages. In the message window, click the Format Text tab and choose the appropriate format in the Format group.

4: Appointment interval

Calendar view defaults to 30-minute intervals. If you maintain a different schedule, you might want to change the default interval as follows:
  1. Right-click the timebar in the day or one of the week views.
  2. Choose one of the intervals shown in Figure E.

Figure E

This shortcut is the easiest way to reset the default interval.

5: Appointment reminder

Outlook reminds you 15 minutes before a scheduled appointment. If you often change the reminder time when you create appointments, change that default reminder to better suit the way you work, as follows:
  1. Click the File tab and choose Options under Help. In Outlook 2007, choose Options from the Tools menu, click the Preferences tab (if necessary), and skip to step 3.
  2. Choose Calendar in the left pane.
  3. In the Calendar Options section, choose the appropriate reminder time from the Default Reminders drop-down, shown in Figure F.
  4. Click OK.

Figure F

Don't work around the default -- set a reminder time that best reflects your scheduling needs.
You're not limited to the listed times, either. For instance, if you want a three-minute reminder, enter "3 minutes."

6: Name order

When you click To in the message window to access the default address book, Outlook displays contact names in First Name, Last Name order. If you have a long list, you might prefer to see contacts alphabetized by last name first. To make this change, do the following:
  1. Click the File tab. In Outlook 2007, choose Account Settings from the Tools menu and skip to step 3.
  2. In the resulting window, choose Account Settings from the Account Settings drop-down.
  3. Click the Address Books tab.
  4. Choose the appropriate account (probably Outlook Address Book) and click Change (just above the list of accounts).
  5. In the resulting dialog box, click the File As (Smith, John) option in the Show Names By option, shown in Figure G.
  6. Click Close twice.
  7. Exit Outlook and reopen it. Outlook won't recognize this change until you do.

Figure G

Display contacts by last name first.

7: Reading pane

The quickest way to see more message text in the Reading Pane is to display less dataabout the message in the header section. To reduce this section to a single line, do the following:
  1. In the Mail window, click the View tab.
  2. From the Change View drop-down, choose Single, as shown in Figure H.

Figure H

Reduce the header information to a single line to free up space in the Reading Pane.
Outlook 2007 users have a very different route:
  1. With the Reading Pane open, choose Current View from the View menu. Then, choose Customize Current View.
  2. Click the Other Settings button.
  3. In the Other Options section, uncheck the Use Compact Layout option.
  4. Check the Always Use Single-Line Layout option.
  5. Click OK twice.

8: Work week

The default work week displays only five days -- Monday through Friday. If you work a nontraditional week, you can change this default to display the days you need, as follows:
  1. Click the File tab and choose Options under Help. In Outlook 2007, choose Options from the Tools menu, click Calendar Options in the Calendar section, and skip to step 3.
  2. Choose Calendar in the left pane.
  3. In the Work Time section, check the days you want to include in your work week. You can include only a few or all seven. Figure I shows a work week that includes Monday through Saturday.
  4. From the First Day Of Week drop-down, choose the day that represents the first day of your work week.
  5. Click OK.

Figure I

Your calendar will accommodate your work week schedule.

9: Download interval

Outlook downloads mail at regular intervals, but you can disable that feature or change the default interval. Do so as follows:
  1. Click the Send/Receive tab. In Outlook 2007, choose Options from the Tools menu, click the Mail Setup tab, click Send/Receive in the Send/Receive section, and skip to step 3.
  2. Click the Send/Receive Groups drop-down in the Send & Receive group and choose Define Send/Receive Groups.
  3. Enter the interval in minutes to the right of the checked Schedule An Automatic Send/Receive Every option to change the interval. You can also uncheck the option to disable the feature and download your mail manually.
  4. Click Close.

10: Months in To-Do

Many of us schedule events well beyond the current month, but the To-Do Bar displays only the current month. With just a few clicks you can display the current and future months, as follows:
  1. Click the View tab. In Outlook 2007, Choose To-Do Bar from the View menu.
  2. Choose Options from the To-Do Bar drop-down in the Layout group. In Outlook 2007, choose Options.
  3. In the Show Date Navigator section, enter the number of months (up to 9) to display in the Number Of Month Rows option, as shown in Figure J. (Enter 0 to display no months.)
  4. Click OK.

Figure J

Entering 3 will display the current and next two months in the To-Do bar.

Thursday 28 May 2015

How to restart your Android phone into safe mode

Safe mode is indispensable when it comes to troubleshooting pesky software problems on your computer. But have you ever wished that a similar feature existed on your Android device? It does, and it’s easy to use: Here’s how to restart your Android phone into safe mode.
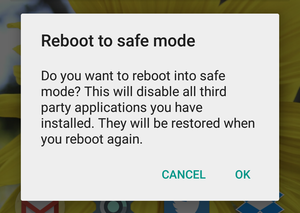
Press and hold your phone’s power button for a few seconds until Android prompts you to turn off your phone—just as you would normally do to power it down. Next, tap and holdPower off for a few seconds until your phone asks you to confirm that you want to enter safe mode. Tap OK, and your phone will restart into safe mode.
android reboot to safe mode
Are you sure you want to restart into safe mode? If so, tap OK.
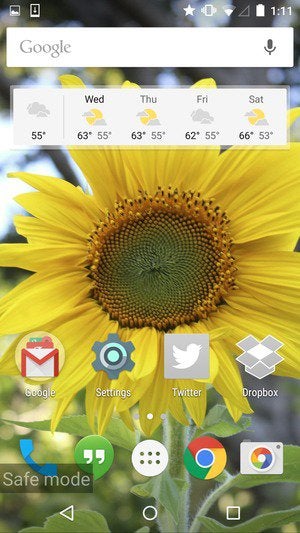
While in safe mode, you won’t be able to open any apps you’ve downloaded onto your phone, and a “Safe mode” badge will appear in the lower left corner of your screen. You may find safe mode useful if you’re trying to determine whether an issue you’re having with your phone is due to an app you’ve installed, or due to Android itself.
android safe mode 2
While in safe mode, you won’t be able to open any third-party apps. Android will remind you that you’re in safe mode with a badge in the lower-left corner.
Safe mode is all-or-nothing when it comes to disabling third-party apps—you can’t disable, say, just the Dropbox app—but it’s better than nothing.
Once you’re done with safe mode, go ahead and power down your phone as you normally would by pressing and holding the power button, then turn it back on.

Tuesday 26 May 2015

Swiss Bank Accounts: 6 Must Know Facts

Opening any form of accounts in Swiss Bank is considered and counted amongst the safest in the world as they maintain high level of privacy with both their domestic and foreign customers.
We often hear politicians, millionaires, criminals or government officials holding money in Swiss Banks.
This is because of the high-security feature of the Swiss Bank. They might refuse to divulge information of account holders. 
Swiss-bank
Here are 6 must know things on Swiss Bank Accounts.

1) Who can open Swiss Bank Account?

Individuals, who have attained the aged of 18 can open a Swiss Bank Account.
However, Swiss Bank has all the rights to reject the application if the bank has doubts on the origin of the funds or may reject a politically exposed person.
The bank takes utmost care so that the banks reputation is not at risk. This is interesting because many individuals may not want to reveal the sources of their income.

2) Documentation

Opening a Swiss Bank account is not very different from opening a regular bank account which involves filling out an application and providing documentation.
However, the scrutiny and authentication level will be done at the higher level where you need to submit all your originals along with the passport.

3) Account cannot be opened online

Swiss Banks follow strict procedures while opening the account, with due diligence. One cannot open the account without visiting the bank.

4) Privacy and Safety

Swiss banks are considered and counted amongst the safest in the world. Swiss Banks have always maintained clients financial privacy.
However, it does not mean that Swiss supports criminals and other illegal activity. The bank policy rights will be suspended in case of criminal proceedings or tax offences.

5) Numbered Account

There is no such thing as an "anonymous" account. Swiss bank strictly follows 'Know Your Client' guidelines.
One can open numbered account which is not, much different from a regular bank account. Under this account, all the transaction are done under the number provided to you and not under your name.
This does not mean the bank will not know the transaction made under this number.

6) Closing an Account

One is free to close the account anytime without restriction and charges.

Every thing you need to know about education loans in India

Objective of education loan:
To provide the much needed financial support to deserving students for pursuing higher professional or technical education in India and abroad. The education loan would be provided to those students who have obtained admission to career-oriented courses e.g. medicine, engineering, management etc., either at the graduate or post-graduate level.
Right support at right time ensures success for students. No deserving students should be stopped to pursue their dreams due to lack of money.

Eligibility:
  • Indian nationals of age between 16 to 35 years, pursuing graduate/postgraduate degree and PG diplomas
  • Confirmed admission in a college/universities recognized by UGC/Govt./AICTE etc., such as Management, Engineering, Medicine, Computer science, Architecture, Hotels and hospitality, Agriculture, Fine arts and design, Pure science/BA/MA/B.Com/ M.Com, Some vocational training and technical training courses such as aviation and air-hostess training are sometimes included too.
  • If you are taking a loan of more than Rs. 7.5 Lakh, a collateral security will be required.
  • Co-applicant: A co-applicant is mandatory for all full time programs. Co-applicant could be Parent/ Guardian or Spouse (if married) / Parent-in-law (if married).

Education loan covers:
  • 100% College Tuition Fees payable
  • Accommodation charges
  • Exam and library fees
  • Books and equipments including computer
  • Travelling expenses abroad
  • Other reasonable expenses required to complete course

Timeline for application approval:
Bank will convey its decision within 15 working days from the date of receipt of the application provided the application is complete in all respects.

Disbursement:
The student loan will be disbursed in full or in suitable installments taking into account the requirement of funds and/or fee schedule as assessed by the Bank directly to the educational institution or vendor of books or equipment or instruments.

Quantum of finance:
  • Rs. 10 lakh for study in India
  • Rs. 20 lakh for study abroad.
Banks may consider lending higher amount in special cases at their discretion.

Security :
  • Upto Rs. 4 lakh – No security, but in this case parents needs to be a joint borrower
  • Between 4-7.5 lakhs- along with parents collateral security in form of third party guarantee
  • Above 7.5 lakhs- Parents to be joint borrowers + tangible collateral security of suitable value required.
Security for the Loan is determined by the quantum of amount required and the credit worthiness of the principal borrower. Following types of Collateral are accepted:
  • Residential property ( house/flat/apartment)
  • Fixed Deposit
  • Life insurance (sum assured being at least 100% of the education loan amount)
  • Non agricultural land

Moratorium period for repayment:
Course period + 1 year or 6 months after getting job, whichever is earlier

Margin money:
  • Nil for loan up to Rs. 4 lakh
  • 5 percent for study in India on loan above Rs. 4 lakhs.
  • 15 percent for study in abroad on loan above Rs. 4 lakhs.

Tenure of loan:
upto 15 years for loan up to Rs 7.5 lakhs and above respectively.

Tax rebate:        
Under section 80(e) of the Indian income tax act, a person can exempt the amount paid against the interest of the education loan – either for self or for his/her spouse or children – for eight years from the year(s) he starts to repay the loan or for the duration the loan is in effect, whichever is more.

Documents Required education loan India
  • Letter of admission
  • Detailed break-up of the costs of the course
  • Completed loan application form and photographs
  • KYC (Know Your Customer)document
  • Academic: Mark sheets / pass certificates of S.S.C, H.S.C, Degree courses
  • PAN Card of the student and Parent/ Guardian
  • AADHAR Card of the student and Parent/ Guardian
  • Proof of identity (Driving Licence/Passport/Aadhar/ any photo identity)
  • Proof of residence (Driving Licence/Passport/Electricity bill/Telephone bill)
  • Student/Co-borrower/ guarantor's bank account statement for last 6 months
  • IT return/ IT assessment order, of previous 2 years of Parent/ Guardian/ other co-borrower (if IT Payee)
  • Brief statement of assets & liabilities of Parent/ Guardian/ other co-borrower
  • Proof of income (i.e. salary slips/ Form 16) Parent/ Guardian/ other co-borrower

Interest Rates:
  • Different banks have different interest rates on your study loan.
  • Interest Rate = Base rate + Mark Up
    • Base rate: 9.5 to 10%
    • Total interest rate comes between 11.75 per cent and 14.75 per cent, depending on the bank, loan amount and the college concerned.
  • Girl students may avail of slightly cheaper rates—by up to 0.50%.

Role of the Guardian:
The parent(s) or guardian of the student would be treated as a co-applicant of the student loan. His or her role would be, necessarily, like the primary debtor.

Disbursement:
The student loan will be disbursed in full or in suitable installments taking into account the requirement of funds and/or fee schedule as assessed by the Bank directly to the educational institution or vendor of books or equipment or instruments.

Terms & conditions:
Bank reserves the right to reject any application / renewal without assigning reasons thereof. It shall be the sole right of the Bank to consider the proposal on case to case basis after taking into consideration, the credentials/credit worthiness of each of the customers.

Central Government Interest Subsidy Scheme for Economically Weaker Section for Education Loans:
Government of India, Ministry of HRD vide letter no. F. 11-4/2010 – U.5(i) dated 25thMay 2010 have formulated a scheme to provide full interest subsidy during the period of moratorium i.e. Course Period plus one year or six months after getting job, whichever is earlier. This scheme is available for loans taken by students belonging to economically weaker sections (EWS) (where annual parental income from all sources is up to & inclusive of `4.5 lakhs) under the Indian Banks’ Association (IBA) approved Model Educational Loan Scheme, for pursuing any of the approved courses of studies in technical and professional streams, from recognized institutions in India. Link

Note:
  1. There is always a risk the student may not get a job immediately after completing the course. So, parents have to be prepared for such a scenario
  2. If you are looking for an education loan, keep these tips in mind:
    1. Ask your chosen educational institution if it has a preferred lender with whom it has negotiated rates or has a pre-approved loan process.
    2. If you are going abroad, ask the institution if you can get a loan on campus after you register for the course. You might be able to get better interest rates abroad. For instance, the general level of interest rates is lower in the US and UK than in India right now.
    3. If you or your family are regulars at your local bank branch, you can use this to your advantage. Sometimes your branch manager can help bring better loan terms your way.

Banks website with education loan details:
  • HDFC Education Loan: Link
  • Axis Education Loan: Link
  • SBI Education Loan: Link
  • Punjab National Bank Education Loan : Link
  • Non Banking Finance Company (NBFC): Avanse
  • First Dedicated Education Loan Company: Credila

Education Loan & Banks perspective:
Loans cannot be claimed as a matter of right. A loan is a debt. The borrower is obliged to pay back or repay the lender at a later period. But it is surprising to note that in India, in the light of directed lending, many a loan is looked upon as charity — “a voluntary help to those in need”.
For Indian banks, the outstanding education loans are reported to be around Rs. 50,000 crore. Education loans are classified as priority sector and are to be encouraged. These loans are to be treated as investment for future economic development and prosperity. Most of the developed and developing countries have student loan schemes.
FROM AID TO RIGHT
In India, the education loan scheme was originally started to help meritorious students pursue higher education in technical and professional courses. However, over the years, rules and regulations got diluted and any student who got admission in a course became eligible for a loan, irrespective of the marks or the process employed in admission.
Education loans started to be viewed increasingly as a financial assistance, not to be repaid. Though such loans are a boon for the poor meritorious students. The existing loan schemes of the banks in India are generally on liberal terms. Loans up to Rs. 10 lakh can be given for studies in India and up to Rs. 20 lakh for studies abroad. Loans up to Rs. 4 lakh are given without any guarantor or collateral.
However, the defaults in education loans are increasing. Large numbers of student borrowers are not able to get jobs within one year. In many cases, salaries are not sufficient to ensure repayments.
The high incidence of failure in examinations, such as that in engineering courses, also creates a large number of overdue loans. But there are borrowers who simply do not pay, in spite of getting lucrative jobs. The percentage of default is found to be higher in loans without security and guarantor. Banks often face problems in tracking the beneficiaries after the course.

Indian Banks’ Association (IBA) Guidelines:

  • Considering the potential damage that NPAs in education loans can cause to the economy, the Indian Banks Association has come out with fresh guidelines on granting of education loans. The guidelines underline the basic banking principle that loans, including educational loans, cannot be claimed as a matter of right. It is to be left to the discretion of bankers to decide whom to lend to and how much to lend, of course based on transparent rules.
  • The IBA has urged banks to put in place an effective appraisal system based on sound commercial logic, while serving a noble social cause.
  • Only students admitted to recognized institutes by a merit-based selection process will be eligible for loans.
  • This will eliminate a large number of students selected in management seats paying capitation fees and donations. Banks must introduce a system to assess the employability of the student after the course.
  • Banks may use rating of education institutes and the individual student as a tool for improving the asset quality.
  • Highly rated students in highly rated institutions may be granted loans at lower rates.
  • Only students admitted to recognized institutes by a merit-based selection process will be eligible for loans.

12 Scholarships for Class 10-12 passed students

The Board results are coming out and now the most critical and crucial time for students are looking for admissions in colleges. This time is important as plenty of organization supports students through various scholarships, some of them are merit based (Board performance based) and some of them are means based (parental income and board marks both).

Here is a list of 10 scholarships with details, Which every student should take a look and must apply as per their eligibility to get benefits.
  1. Loreal India for Young Women in Science Scholarships
Purpose- Scholarship is only for Girl students desirous of pursuing degree course in science/medical/ engineering/ biotechnology or any other scientific field
Award-Cash Rs 2.5 lakh to each girl
Eligibility- Mumbai, Bangalore, Delhi NCR, Hyderabad Girl Student
Apply-Post, Online
Activity-May, June
(Subscribe now and get 40% discount (coupon code: U78TYIP9) on class 12 passed scholarship SMS/Email alerts click here)

  1. G.P. Birla Educational Scholarships
Award: Rs 50000 per year
Eligibility-Class 12 Passed, 80% + Marks in State Board, or 85% in Central board, or have secured rank in top 150000 in AIEEE/JEE/AIPMT
Course: Science, Humanities, Engineering, Medicine, Architecture, Commerce or Law
Apply-by Post
Activity-June, July
(Subscribe now and get 40% discount (coupon code: U78TYIP9) on class 12 passed scholarship SMS/Email alerts click here)

  1. Sahu Jain Trust- Loan Scholarship
Purpose- Non Refundable Scholarship for pursuing  Graduation and Post Graduation in all subjects. 
Award-    Financial Support, Certificates
Eligibility- Graduation / Post Graduation in Engg, Medical, MBA
Apply- By Post
Activity- March to July
(Subscribe now and get 40% discount (coupon code: U78TYIP9) on class 12 passed scholarship SMS/Email alerts click here)

  1. Merit cum Means Scholarship for Minority Students
Purpose- To provide financial assistance to the poor and meritorious students belonging to minority communities to enable them to pursue professional and technical courses
Award-    Rs 25,000 to Rs 30,000 per year
Eligibility- Class 12 Passed, Graduates of Muslim, Christian, Parsis, Bauddhist, Sikhs, Jain community
Apply- Online
Activity- June to September
(Subscribe now and get 40% discount (coupon code: U78TYIP9) on class 12 passed scholarship SMS/Email alerts click here)

  1. FAEA Scholarship
Purpose- To secure social justice for students belonging to socially and economically disadvantaged sections of the society. It enables economically and socially disadvantaged students to study in the institutions, which provide academic excellence, access to structures of power and economic opportunity. 
Award- Higher education scholarship
Eligibility-Class 12 passed, 1st year Graduation
Apply-Online, Post
Activity- May, June
(Subscribe now and get 40% discount (coupon code: U78TYIP9) on class 12 passed scholarship SMS/Email alerts click here)

  1. R D Sethna Loan Scholarship 2014
Purpose- To empower individuals for pursuing their academic interests and career. The loan scholarships are granted to cover fees, both books and tuitions.
Award-    Financial, Certificates
Eligibility- Class 12 Passed
Apply- By Post, in Person
Activity-April to August
(Subscribe now and get 40% discount (coupon code: U78TYIP9) on class 12 passed scholarship SMS/Email alerts click here)

  1. Post-matric Scholarship for Minority Students
Purpose- To support Minority community students for studies in a government or private higher secondary school/ college/ university. And, technical and vocational courses in Industrial Training Institutes/ Industrial Training Centres affiliated with the National Council for Vocational Training (NCVT) of classes 11 and 12 level.
Award-Education Scholarship of Rs. 9,300 to Rs 13,800 per year
Eligibility-Class 11, 12, 12+ of Muslims, Sikhs, Christians, Buddhists and Zoroastrians (Parsis), Family income less than Rs. 2 lakh
Apply-Online, Post
Activity- August, September
(Subscribe now and get 40% discount (coupon code: U78TYIP9) on class 12 passed scholarship SMS/Email alerts click here)

  1. Maulana Azad National Scholarship for Minority Community Girls
Purpose- Scholarship is awarded to study any subject offered by School/College for Muslims, Christians, Buddhists, Sikhs, Parsis Girls in class 11 & 12
Award-Cash Scholarship of Rs 12,000
Eligibility-Class 11 Girls
Apply- Online
(Subscribe now and get 40% discount (coupon code: U78TYIP9) on class 12 passed scholarship SMS/Email alerts click here)

  1. Gaurav Foundation Scholarship
Award-Rs. 20000-2 Lakhs
Eligibility-11yrs-35yrs, All students
Apply-By Email
Deadline-September to November
B4S: www.b4s.in/UID/GFMS
(Subscribe now and get 40% discount (coupon code: U78TYIP9) on class 12 passed scholarship SMS/Email alerts click here)

  1. The tGELF Khemka Domestic Scholarships/Grants 2014
Eligibility-Class 12 passed
Apply- Online
Course-All undergraduate courses
Activity-June, July
(Subscribe now and get 40% discount (coupon code: U78TYIP9) on class 12 passed scholarship SMS/Email alerts click here)

  1. North South Foundation (NSF) Scholarship 2014-15
Award- Rs 5000 to 12000 per year
Eligibility-Class 12 passed students in top 10% in Board & Exams, Family income is less than equal to Rs 65000
Apply-Online, By Post
Course: Professional courses like Engineering, Medicine, and Polytechnic in a GOVERNMENT COLLEGE
Deadline-September
(Subscribe now and get 40% discount (coupon code: U78TYIP9) on class 12 passed scholarship SMS/Email alerts click here)

  1. Nirmaan Scholarship and Mentorship Program (NSMP)
Award- College Fee till course completion
Eligibility-Class 12 Passed, Merit cum MeansApply-Online, By Post
Course: Professional courses like Engineering, Medicine, and Polytechnic in a GOVERNMENT COLLEGE
Deadline-June, July
(Subscribe now and get 40% discount (coupon code: U78TYIP9) on class 12 passed scholarship SMS/Email alerts click here)

In addition to above, There are many prestigious scholarships are in line.
  1. Central Sector Scheme Scholarship for Class 12 passed students of Science, Commerce & Arts subjects
Total 84000 Scholarships (50% for Girls and boys each)
Award- Graduation course: Rs 10,000 per year for 3 years, Masters course: Rs 20,000 per year for next 2 years
Apply-Online, Post
Activity: August, September
(Subscribe now and get 40% discount (coupon code: U78TYIP9) on class 12 passed scholarship SMS/Email alerts click here)

  1. INSPIRE Scholarship for Class 12 Board performers (Top1 percentile), Performance in JEE Mains, Advance, NEET, KVPY, NTSE, IMO etc Competitive Examinations.
Total 10000 Scholarships
Award- Annual scholarship of total value Rs.80,000 till the course completion
Apply-Online, Post
Activity: September, October
(Subscribe now and get 40% discount (coupon code: U78TYIP9) on class 12 passed scholarship SMS/Email alerts click here)

  1. Indian Oil Academic Scholarship for Class 10, 12 passed students
Total-2600 Scholarships
Award-1000 Rs per month
Course-10+/ITI, Engineering & MBBS, MBA
Apply-Online
Activity: August, September
(Subscribe now and get 40% discount (coupon code: U78TYIP9) on class 12 passed scholarship SMS/Email alerts click here)

  1. CBSE Single Girl Child Scholarship for Class 10 passed ONLY SINGLE GIRL CHILD of their parents.
Award- 500Rs per month for 2 years
Course-Class 11 & 12 study

Apply-Online
Activity: August, September